PVC boards (Polyvinyl Chloride boards) have become a popular choice across construction, interior design, and industrial applications due to their durability, lightweight structure, and inherent resistance to moisture. However, while PVC is naturally water-resistant, achieving complete waterproofing performance—especially in demanding environments—requires proper preparation, the right techniques, and attention to detail.
This guide provides a practical, professional overview of how to waterproof PVC boards effectively, ensuring long-term performance and reliability.
Why Waterproofing PVC Boards Still Matters
Although PVC boards are non-porous and resistant to water absorption, they are not entirely immune to issues caused by prolonged exposure to moisture. Over time, water can seep into joints, edges, or improperly sealed surfaces, leading to:
- Mold or mildew buildup in adjacent materials
- Adhesive failure in installations
- Structural weakening in composite assemblies
- Aesthetic damage such as staining or discoloration
Waterproofing enhances the board’s performance, especially in wet environments such as bathrooms, kitchens, laboratories, and outdoor installations.
Step 1: Surface Preparation is Key
Proper preparation is the foundation of successful waterproofing. Even the best waterproofing products will fail if applied to a poorly prepared surface.
Cleaning the Surface
Start by removing dust, grease, and contaminants from the PVC board. Use a mild detergent or isopropyl alcohol with a clean cloth. Avoid harsh chemicals that could damage the surface.
Light Sanding
PVC boards have a smooth surface that can reduce coating adhesion. Lightly sand the surface using fine-grit sandpaper (around 220 grit) to create a slightly rough texture. This improves bonding for sealants or coatings.
Drying
Ensure the surface is completely dry before proceeding. Moisture trapped under coatings can compromise waterproofing performance.
Step 2: Sealing Joints and Edges
The most vulnerable areas of PVC board installations are the seams and edges. These must be sealed properly to prevent water ingress.
Use High-Quality Sealants
Apply a waterproof sealant such as silicone or polyurethane along joints and edges. These materials are flexible, durable, and resistant to temperature changes.
Apply Evenly
Use a caulking gun for precise application. Smooth the sealant with a finishing tool or gloved finger to ensure a tight, uniform seal.
Allow Proper Curing
Follow manufacturer guidelines for curing time. Rushing this step can lead to weak seals and future leaks.
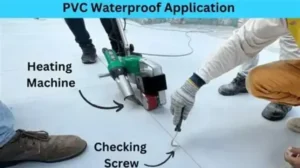
Step 3: Applying Waterproof Coatings
While PVC boards are inherently resistant to water, applying an additional waterproof coating can significantly enhance their performance.
Choose the Right Coating
Options include:
- Acrylic waterproof coatings
- Polyurethane coatings
- Epoxy-based sealers
Each has its advantages, but polyurethane coatings are often preferred for their flexibility and durability.
Application Techniques
Use a roller, brush, or spray system depending on the project scale. Apply thin, even layers rather than thick coats to avoid bubbling or uneven curing.
Multiple Layers
For optimal results, apply at least two coats. Allow each layer to dry completely before applying the next.
Step 4: Waterproofing Fasteners and Fixings
In many installations, PVC boards are secured using screws or mechanical fasteners. These points can become entry paths for water if not treated properly.
- Use corrosion-resistant screws (e.g., stainless steel)
- Apply sealant around screw heads
- Consider using rubber washers for additional protection
This step is particularly important in outdoor or high-humidity environments.
Step 5: Testing the Waterproofing
Before final use, it’s advisable to test the waterproofing system.
Visual Inspection
Check for gaps, uneven coatings, or missed areas.
Water Test
Lightly spray or expose the surface to water and observe any signs of leakage or absorption around joints and edges.
Address any issues immediately to avoid costly repairs later.
Pro Tips for Long-Lasting Results
1. Work in Controlled Conditions
Avoid applying coatings in extremely humid or cold environments, as this can affect curing and adhesion.
2. Use Compatible Materials
Ensure that sealants, adhesives, and coatings are compatible with PVC surfaces to prevent chemical reactions or poor bonding.
3. Prioritize Ventilation
Proper airflow helps coatings cure evenly and prevents trapped moisture.
4. Regular Maintenance
Inspect installations periodically, especially in high-moisture areas. Reapply sealant if any cracks or wear appear.
5. Focus on Installation Quality
Even the best waterproofing materials cannot compensate for poor installation practices. Ensure proper alignment, spacing, and structural support.
- Common Mistakes to Avoid
- Skipping surface preparation
- Applying coatings too thickly
- Ignoring joints and edges
- Using low-quality or incompatible sealants
- Not allowing sufficient curing time
Avoiding these mistakes can significantly improve the durability and effectiveness of your waterproofing system.
Applications of Waterproofed PVC Boards
Waterproofed PVC boards are widely used in:
- Bathroom wall panels
- Kitchen cabinetry and backsplashes
- Laboratory furniture and surfaces
- Exterior cladding
- Industrial partitions
Their versatility, combined with proper waterproofing, makes them an excellent solution for both residential and commercial projects.
Conclusion
Waterproofing PVC boards doesn’t have to be complicated. With the right preparation, appropriate materials, and proper application techniques, you can significantly enhance their durability and performance.
By focusing on critical areas such as surface preparation, joint sealing, and coating application, you ensure that your PVC board installations remain reliable—even in the most demanding environments. Whether you’re a contractor, builder, or DIY enthusiast, mastering these simple steps will help you achieve professional-grade results with confidence.